

Why lift your Club Car
Lifting your Club Car is less about vanity and more about function. A lift kit is the single most effective way to change how the vehicle handles the terrain beneath it. For owners of the DS, Precedent, or Tempo models, the stock suspension is tuned for flat, manicured fairways. It is not built for the rocky trails, grassy dunes, or muddy paths that many enthusiasts encounter on weekends. Raising the chassis transforms the cart from a strictly recreational vehicle into a capable off-road runner.
The primary mechanical benefit is increased ground clearance. Stock models often sit dangerously close to the ground, meaning a single rock or rut can damage the undercarriage, suspension components, or battery trays. By raising the chassis, you gain the necessary clearance to navigate obstacles without scraping. This is particularly important for the DS and Precedent, which have distinct frame geometries that benefit from specific lift heights to maintain proper axle articulation.
Higher clearance also allows for larger, more aggressive tires. Standard golf cart tires are narrow and smooth, designed for low rolling resistance on grass. With a lift kit, you can fit wider, knobby tires that provide significantly better traction on loose dirt or wet surfaces. This combination of clearance and tire size improves suspension travel, absorbing bumps that would otherwise jar the passengers and damage the cart's frame over time.
However, lifting changes the vehicle's center of gravity. Raising the body makes the cart taller and slightly less stable in sharp turns or on steep slopes. Always check handling characteristics after installation, and consider adding sway bars or upgraded shocks to maintain control. The goal is to improve capability without compromising safety.
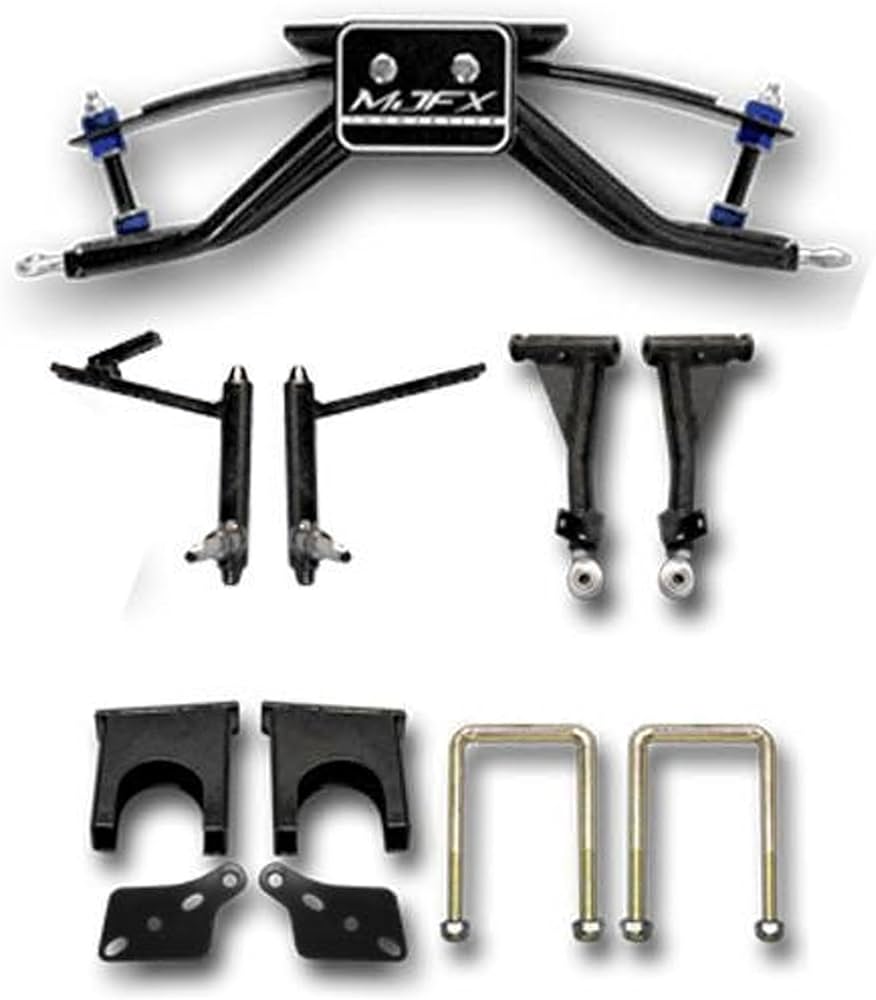
Best Lift Kits for Club Car DS
Choosing the right Club Car Lift Kits for your DS model depends on how much ground clearance you need and whether you prioritize style or off-road capability. The DS chassis offers a versatile platform for modifications, ranging from subtle stance adjustments to full off-road conversions. Below are the most reliable options currently available, categorized by lift height and intended use.
1-Inch Low Profile Lift Kit
This option is ideal for owners who want to fit larger 12-inch or 14-inch wheels without altering the cart’s original geometry. It functions as a simple block lift, raising the front end just enough to clear wider tires while maintaining the factory ride quality. This setup is perfect for street-legal carts that need a cleaner look without sacrificing stability or speed.
3-Inch to 4-Inch Standard Lift Kit
A mid-range lift provides a noticeable increase in ground clearance, allowing for 20-inch to 22-inch tires. This height strikes a balance between aesthetics and function, offering better visibility over rough terrain while keeping the center of gravity low enough for safe handling on fairways. Most standard kits include new upper control arms and extended brake lines to ensure proper alignment and safety.
6-Inch Long Travel Lift Kit
For serious off-roading, a 6-inch long travel lift kit is the top choice. These kits replace stock suspension components with heavy-duty shocks and arms designed to absorb significant impacts from rocks, ruts, and uneven trails. The increased travel allows for massive tires and superior articulation, turning your Club Car DS into a capable utility vehicle or trail runner.


As an Amazon Associate, we may earn from qualifying purchases.
Best lifts for Precedent and Tempo
Club Car Lift Kits for the Precedent and Tempo models require a slightly different approach than older DS series carts. These newer platforms feature a more integrated suspension geometry and often come with larger stock tires, which changes how much lift you can safely add without compromising the steering linkage or CVT belt life.
Low-profile options for subtle upgrades
If you are running a Precedent or Tempo with 14-inch wheels, you might only need a small lift to clear slightly wider tires or just to level the stance. A 1-inch block lift is often the sweet spot here. It raises the front end just enough to accommodate 12-inch or 14-inch low-profile tires without requiring major modifications to the control arms or brake lines.
This approach keeps the center of gravity low, preserving the handling characteristics that make these models so stable on the course. It is a conservative upgrade that avoids the common pitfalls of over-lifting, such as excessive body roll or premature wear on the drivetrain components.
Moderate lifts for larger tires
For those wanting to run 20-inch or 22-inch tires, a 4-inch to 6-inch lift kit is standard for both the Precedent and Tempo. These kits typically include extended shock absorbers, longer brake lines, and sometimes modified control arms to maintain proper suspension articulation.
The goal is to fill the wheel wells without making the cart top-heavy. When choosing a lift for these models, look for kits that specifically mention compatibility with the Tempo’s rear suspension or the Precedent’s specific frame rails. Generic kits designed for older DS models may not align correctly, leading to installation headaches or unsafe driving conditions.
Comparison: Precedent vs. Tempo Lift Requirements
| Feature | Precedent Lift Kits | Tempo Lift Kits |
|---|---|---|
| Max Safe Lift | 6-8 inches | 4-6 inches |
| Key Constraint | Steering linkage length | Rear suspension geometry |
| Common Tire Size | 20" - 22" | 18" - 20" |
| Typical Price Range | $300 - $800 | $250 - $600 |
Installation considerations
Installing lift kits on Precedent and Tempo models is generally straightforward if you have basic mechanical skills. However, the Tempo’s rear suspension can be trickier to align than the Precedent’s solid axle setup. Always torque all bolts to manufacturer specifications and test drive at low speeds to check for rubbing or steering binding before taking the cart on the road.


As an Amazon Associate, we may earn from qualifying purchases.
Installation and safety tips
Installing Club Car Lift Kits requires more than just swapping parts; it demands precision to maintain the structural integrity of your DS, Precedent, or Tempo model. A lifted suspension changes the vehicle's center of gravity, making proper torque and alignment critical for safe operation. Skipping these steps can lead to premature wear on bushings or, worse, a catastrophic failure while driving.
1. Prepare the workspace and tools
Start by parking your cart on a level surface and engaging the parking brake. You will need a basic socket set, torque wrench, and jack stands. Ensure you have enough space to safely lift the rear of the vehicle. For DS models, remove the rear wheels to access the leaf springs or shock mounts clearly. This step prevents injury and ensures you can see the mounting points without obstruction.
2. Remove old suspension components
Carefully unbolt the existing shocks and any spacers or lift blocks. On Precedent models, note the orientation of the control arms before removal, as reassembly requires exact alignment. Keep all bolts organized in a tray. If you encounter rusted bolts, apply penetrating oil and let it sit for ten minutes. Do not force components off, as this can damage the frame rails.
3. Install the lift kit
Place the new lift blocks or spacers onto the axle or frame mounts. For a 2-inch lift, this is often a straightforward swap. For larger lifts (3-4 inches), you may need to extend brake lines and drive shafts to prevent binding. Tighten all bolts to the manufacturer’s specified torque settings. Over-tightening can strip threads, while under-tightening allows components to shift under load.
4. Reassemble and torque
Reattach the wheels and lower the cart slowly. Once on the ground, perform a final torque check on all lug nuts and suspension bolts. The vehicle settles after the first few drives, so a second check after 50 miles is recommended. This ensures that the lift kit remains secure and does not loosen due to vibration.
5. Test drive and inspect
Before taking the cart onto the road, perform a low-speed test drive. Check for unusual noises, pulling to one side, or brake interference. If the cart feels unstable, recheck the alignment and bushing tightness. A properly installed lift kit should feel firm and responsive, not loose or rattling.
Common lift kit: what to check next
Here are the answers to the specific questions buyers ask before installing Club Car Lift Kits.
How much does it cost to lift a golf cart?
Budget for the kit itself and labor. Lift kits range from $50 for basic rear-only spacers to $1,500 for full long-travel systems. A standard Club Car DS or Precedent lift typically costs between $200 and $600 for parts alone.
What is the difference between lifted and non-lifted?
Non-lifted models offer a lower center of gravity for everyday stability and comfort. Lifted suspensions raise the chassis to accommodate larger tires and improve ground clearance, trading some ride smoothness for better off-road capability and a more aggressive look.
How tall is a lifted Club Car?
Height depends on the lift inches and tire size. A 4-inch lift on a Club Car Tempo or DS usually adds 4-6 inches to the overall height. Always check the specific manufacturer specs for your model, as larger tires add additional height on top of the lift kit.
No comments yet. Be the first to share your thoughts!