
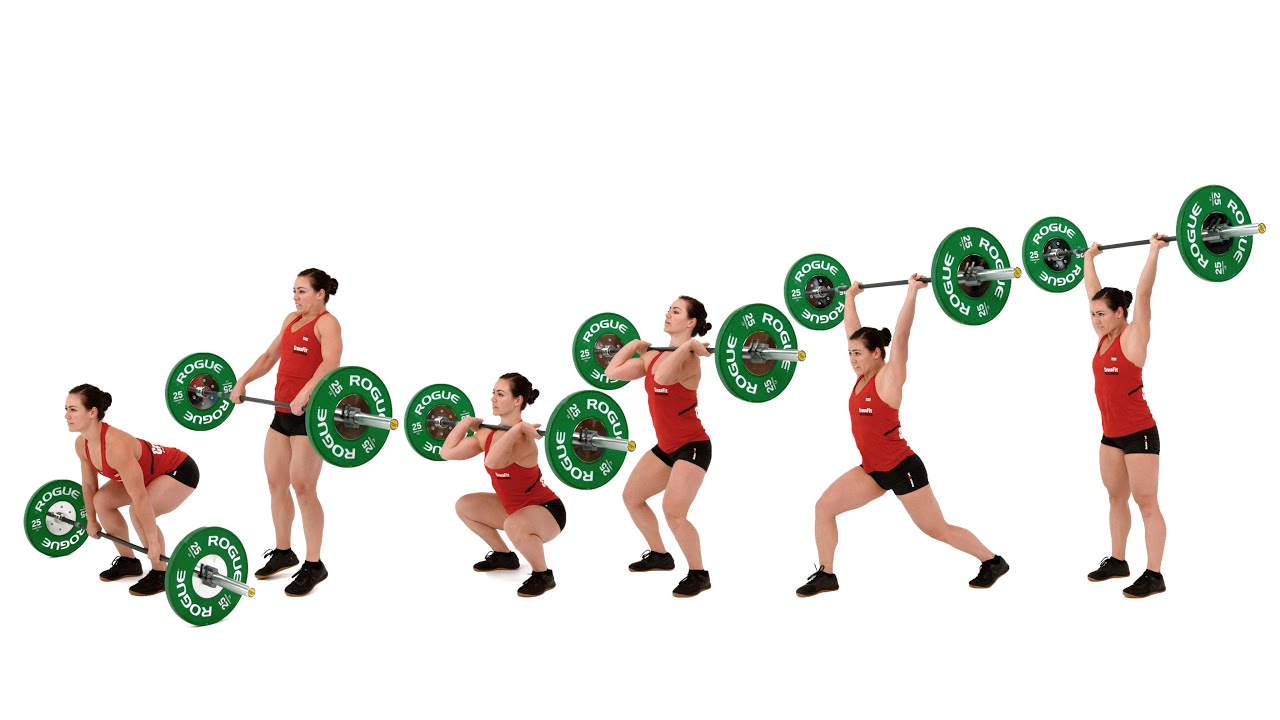
Paris 2024: how the clean & jerk changed
The Paris 2024 Olympics changed how we look at the clean & jerk. Li Fabin won the men’s 61kg with pure speed, while Hou Zhihui kept her lead in the women’s 49kg through sheer consistency. The real story wasn't the weight on the bar, but how lifters moved it. We saw a shift toward tighter bar paths and less time spent grinding under the load.
Several lifters demonstrated a trend toward a more aggressive pull, maximizing speed off the floor. This wasn’t about brute force, but about leveraging leg drive and maintaining a tight back angle for as long as possible. We also observed increased use of the "dip and drive" style in the jerk, particularly among athletes with shorter limbs. This suggests a shift towards optimizing mechanics for individual body types.
For the aspiring weightlifter, the key takeaway isn’t to simply copy what the champions do, but to understand why they do it. Technique isn’t static; it evolves with each Olympic cycle as athletes and coaches push the boundaries of what’s possible. The 2024 Games highlighted the importance of a holistic approach – strength, speed, flexibility, and, above all, a deep understanding of biomechanics.
Heading into 2026, the podium will belong to lifters who adapt to these tighter mechanics. Success now depends on finding the shortest path for the bar. The Paris results are the new standard for anyone training for the next cycle.
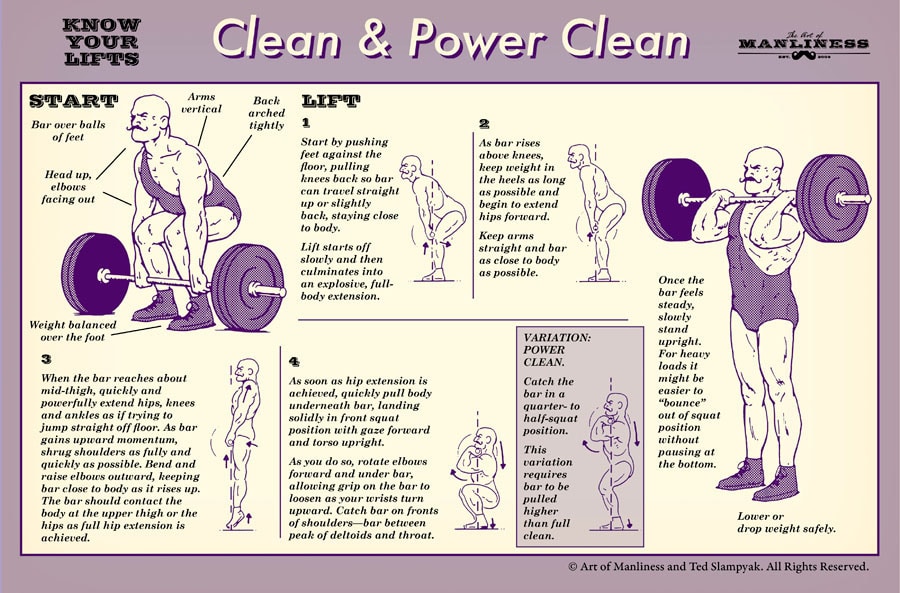
The pull
The pull starts everything. You need enough momentum to get the bar past the knees and into the hip. I recommend a grip just outside shoulder width. If you go wider, you shorten the distance the bar travels but lose some stability. A narrow grip is stronger but makes for a longer pull.
Maintaining a consistent back angle throughout the pull is paramount. Think about keeping your spine neutral and your chest up. A common mistake is allowing the back to round, which not only reduces power output but also significantly increases the risk of injury. The legs should be driving, not just extending. The power comes from pushing the floor away, not from pulling with your back.
The bar path should be as straight as possible. Visualize the bar traveling vertically upwards, close to your shins and thighs. Avoid letting the bar drift forward, as this will throw off your balance and force you to compensate during the transition. Many lifters underestimate how much of the lift comes from the legs; it’s not about arm strength.
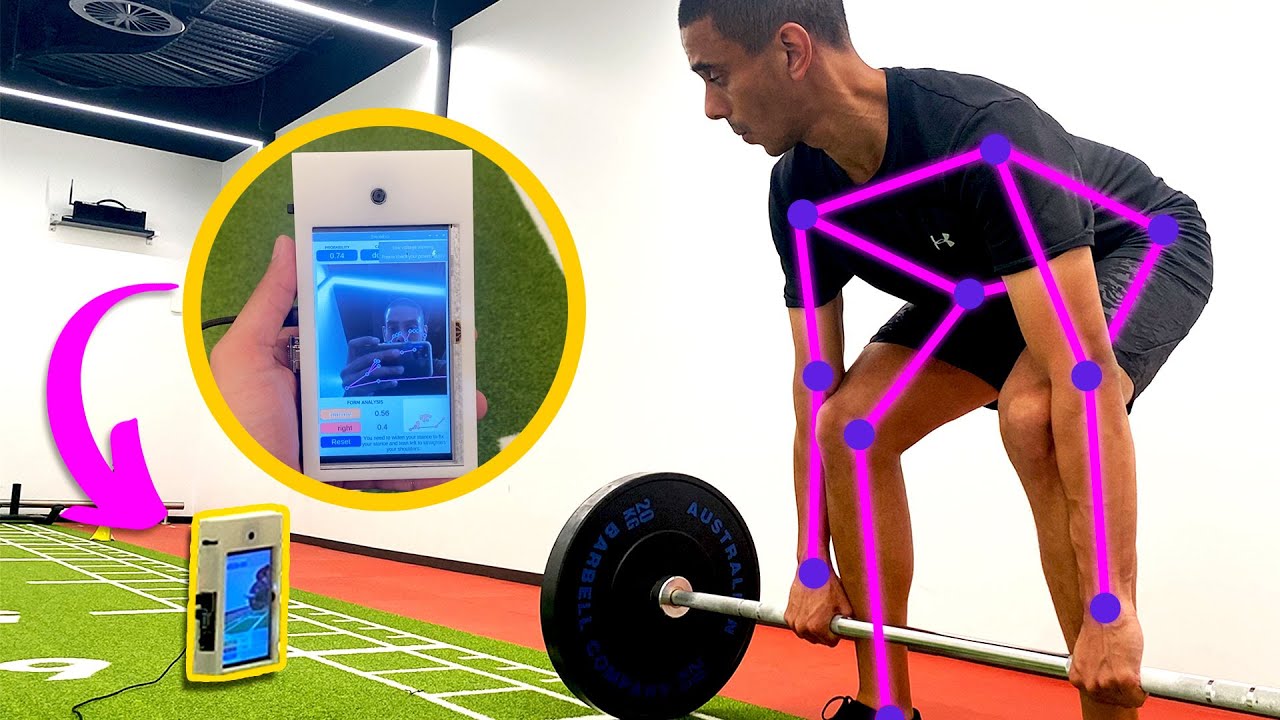
To correct rounding, practice drills like Romanian deadlifts and good mornings to strengthen your posterior chain. To improve bar path, film yourself lifting and analyze your technique. Focus on keeping your elbows close to your body and driving with your legs. Remember, the pull isn’t about speed alone—it’s about controlled explosiveness.
- Keep your spine neutral from the floor to the hip.
- Drive through your legs, keeping your back angle consistent.
- Keep the bar close to your body.
- Focus on explosive power, not just speed.
The transition
The transition is arguably the most technically demanding part of the clean & jerk. It’s the moment when you shift from the pull to the catch, rapidly dropping under the bar while simultaneously rotating your wrists to receive it in the front rack position. Timing is everything. You need to initiate the turnover at the peak of the pull, before the bar begins to descend.
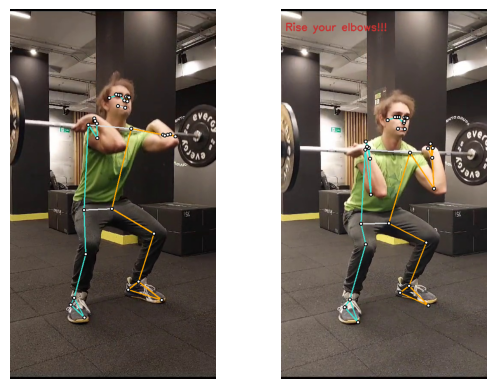
Speed is also critical. The faster you can drop under the bar, the more efficient the transition will be. But speed without control is useless. You need to maintain a stable core and a strong front rack position to support the weight. The lats play a vital role in pulling the elbows high and creating a shelf for the bar.
A flexible front rack position is essential. Many lifters struggle with this because of limited wrist or shoulder mobility. Regularly stretching your wrists and shoulders can significantly improve your ability to receive the bar comfortably and securely. It's about creating space for the bar without compromising your stability.
I’ve seen so many lifts fail during the transition because of poor timing or a weak front rack. Drills like front squats with an emphasis on maintaining a high elbow position can help. Practicing the turnover with a lighter weight, focusing on speed and precision, is also beneficial.
- Prioritize timing and speed.
- Maintain a stable core.
- Ensure a flexible front rack position.
- Strengthen your lats for elbow support.
The catch and recovery
The catch is the moment you receive the weight in the front squat position. Depth is important, but it shouldn’t come at the expense of stability. Aim for a depth where your hip crease is below your knees, but maintain a neutral spine and a tight core. Your back angle should remain relatively consistent throughout the catch.
Core engagement is crucial for maintaining stability under a heavy load. Think about bracing your core as if you’re about to be punched in the stomach. This will help prevent your lower back from rounding and protect you from injury. Elbow position is also key – keep your elbows high and pointed forward.
Recovery from the catch should be smooth and controlled. Drive through your heels to stand up, maintaining a tight core and a neutral spine. Avoid jerking or bouncing out of the bottom position. Squat depth will vary based on individual anatomy and lifting style. It’s about finding what works for your body.
Some lifters prefer a deeper squat, while others prefer a shallower one. Experiment with different depths to find what allows you to maintain stability and generate the most power. Regularly practicing front squats and overhead squats can improve your catch and recovery technique.
The jerk
The jerk is the final phase of the clean & jerk, where you drive the weight from your shoulders to an overhead locked-out position. It consists of three key phases: the dip, the drive, and the split (or power jerk). The dip is a controlled descent into a partial squat, preparing your legs for the explosive drive.
The drive is the most powerful part of the jerk. As you extend your legs, drive your arms upwards, keeping the bar close to your body. Timing is crucial – the drive should be synchronized with the leg extension. A strong, stable overhead position is essential for a successful jerk.
There are two main variations of the jerk: the split jerk and the power jerk. The split jerk involves splitting your legs into a staggered stance, with one leg forward and one leg back. The power jerk involves jumping vertically and receiving the weight with your legs in a more parallel position. I’m a big believer in mastering the split jerk first.
The split jerk offers more stability and allows you to lift heavier weights, but it requires more coordination and flexibility. The power jerk is faster and more efficient, but it requires more explosive power. Choose the variation that best suits your body type and training goals. Focus on driving the weight straight up, keeping your core engaged, and locking out your elbows.
- Control the dip.
- Synchronize the drive with leg extension.
- Maintain a strong, stable overhead position.
- Choose the jerk variation that suits your body type.
Common jerk mistakes
One common mistake is leaning forward during the jerk. This throws off your balance and makes it difficult to lock out the weight. To correct this, focus on keeping your core engaged and your back straight. Another mistake is failing to lockout your elbows. This indicates a lack of shoulder strength or a technical flaw in your technique.
An uneven split position can also lead to instability and a failed lift. Practice drills to improve your balance and coordination. Loss of balance is often a result of poor footwork or a weak core. Work on strengthening your core and practicing your footwork drills. These issues can often be addressed with focused practice.
To fix leaning, try practicing jerk drills with a lighter weight, focusing on maintaining a neutral spine. For elbow lockout, incorporate overhead press variations into your training program. To improve split position, practice split squats and lunges. For balance, work on single-leg balance exercises.
We’ll focus on drills you can do with just the bar to build the necessary strength and stability. Things like overhead squats with a PVC pipe, and practicing the dip and drive without weight are great starting points. Consistency in these drills is key.
- Leaning forward: Maintain a neutral spine and engage your core.
- Failing to lockout: Strengthen your shoulders and refine your technique.
- Uneven split position: Practice balance and coordination drills.
- Loss of balance: Strengthen your core and improve your footwork.
Accessory work
Accessory work is essential for addressing weaknesses and improving the specific muscle groups and movement patterns required for the clean & jerk. A well-rounded program should include exercises for core strength, leg power, upper back strength, and shoulder mobility. I'm not talking about just throwing in random exercises; these need to directly support the lift.
For core strength, consider planks, Russian twists, and anti-rotation press exercises. For leg power, focus on back squats, front squats, and Romanian deadlifts. Upper back strength can be improved with pull-ups, rows, and face pulls. Shoulder mobility exercises include band pull-aparts, dislocates, and overhead stretches.
Here’s a sample accessory workout program: Monday - Core (3 sets of 15-20 reps per exercise); Tuesday - Legs (3 sets of 5-8 reps per exercise); Wednesday - Upper Back (3 sets of 8-12 reps per exercise); Thursday - Shoulder Mobility (10-15 minutes of dynamic stretching).
Remember to prioritize proper form and technique over lifting heavy weights. The goal is to strengthen your weaknesses and improve your overall movement quality. Listen to your body and adjust the program as needed. This is a starting point; customize it to your individual needs and recovery capacity.
- Planks, Russian twists, and anti-rotation press for core strength.
- Back squats, front squats, and Romanian deadlifts for leg power.
- Pull-ups, rows, and face pulls for upper back strength.
- Band pull-aparts, dislocates, and overhead stretches for shoulder mobility.
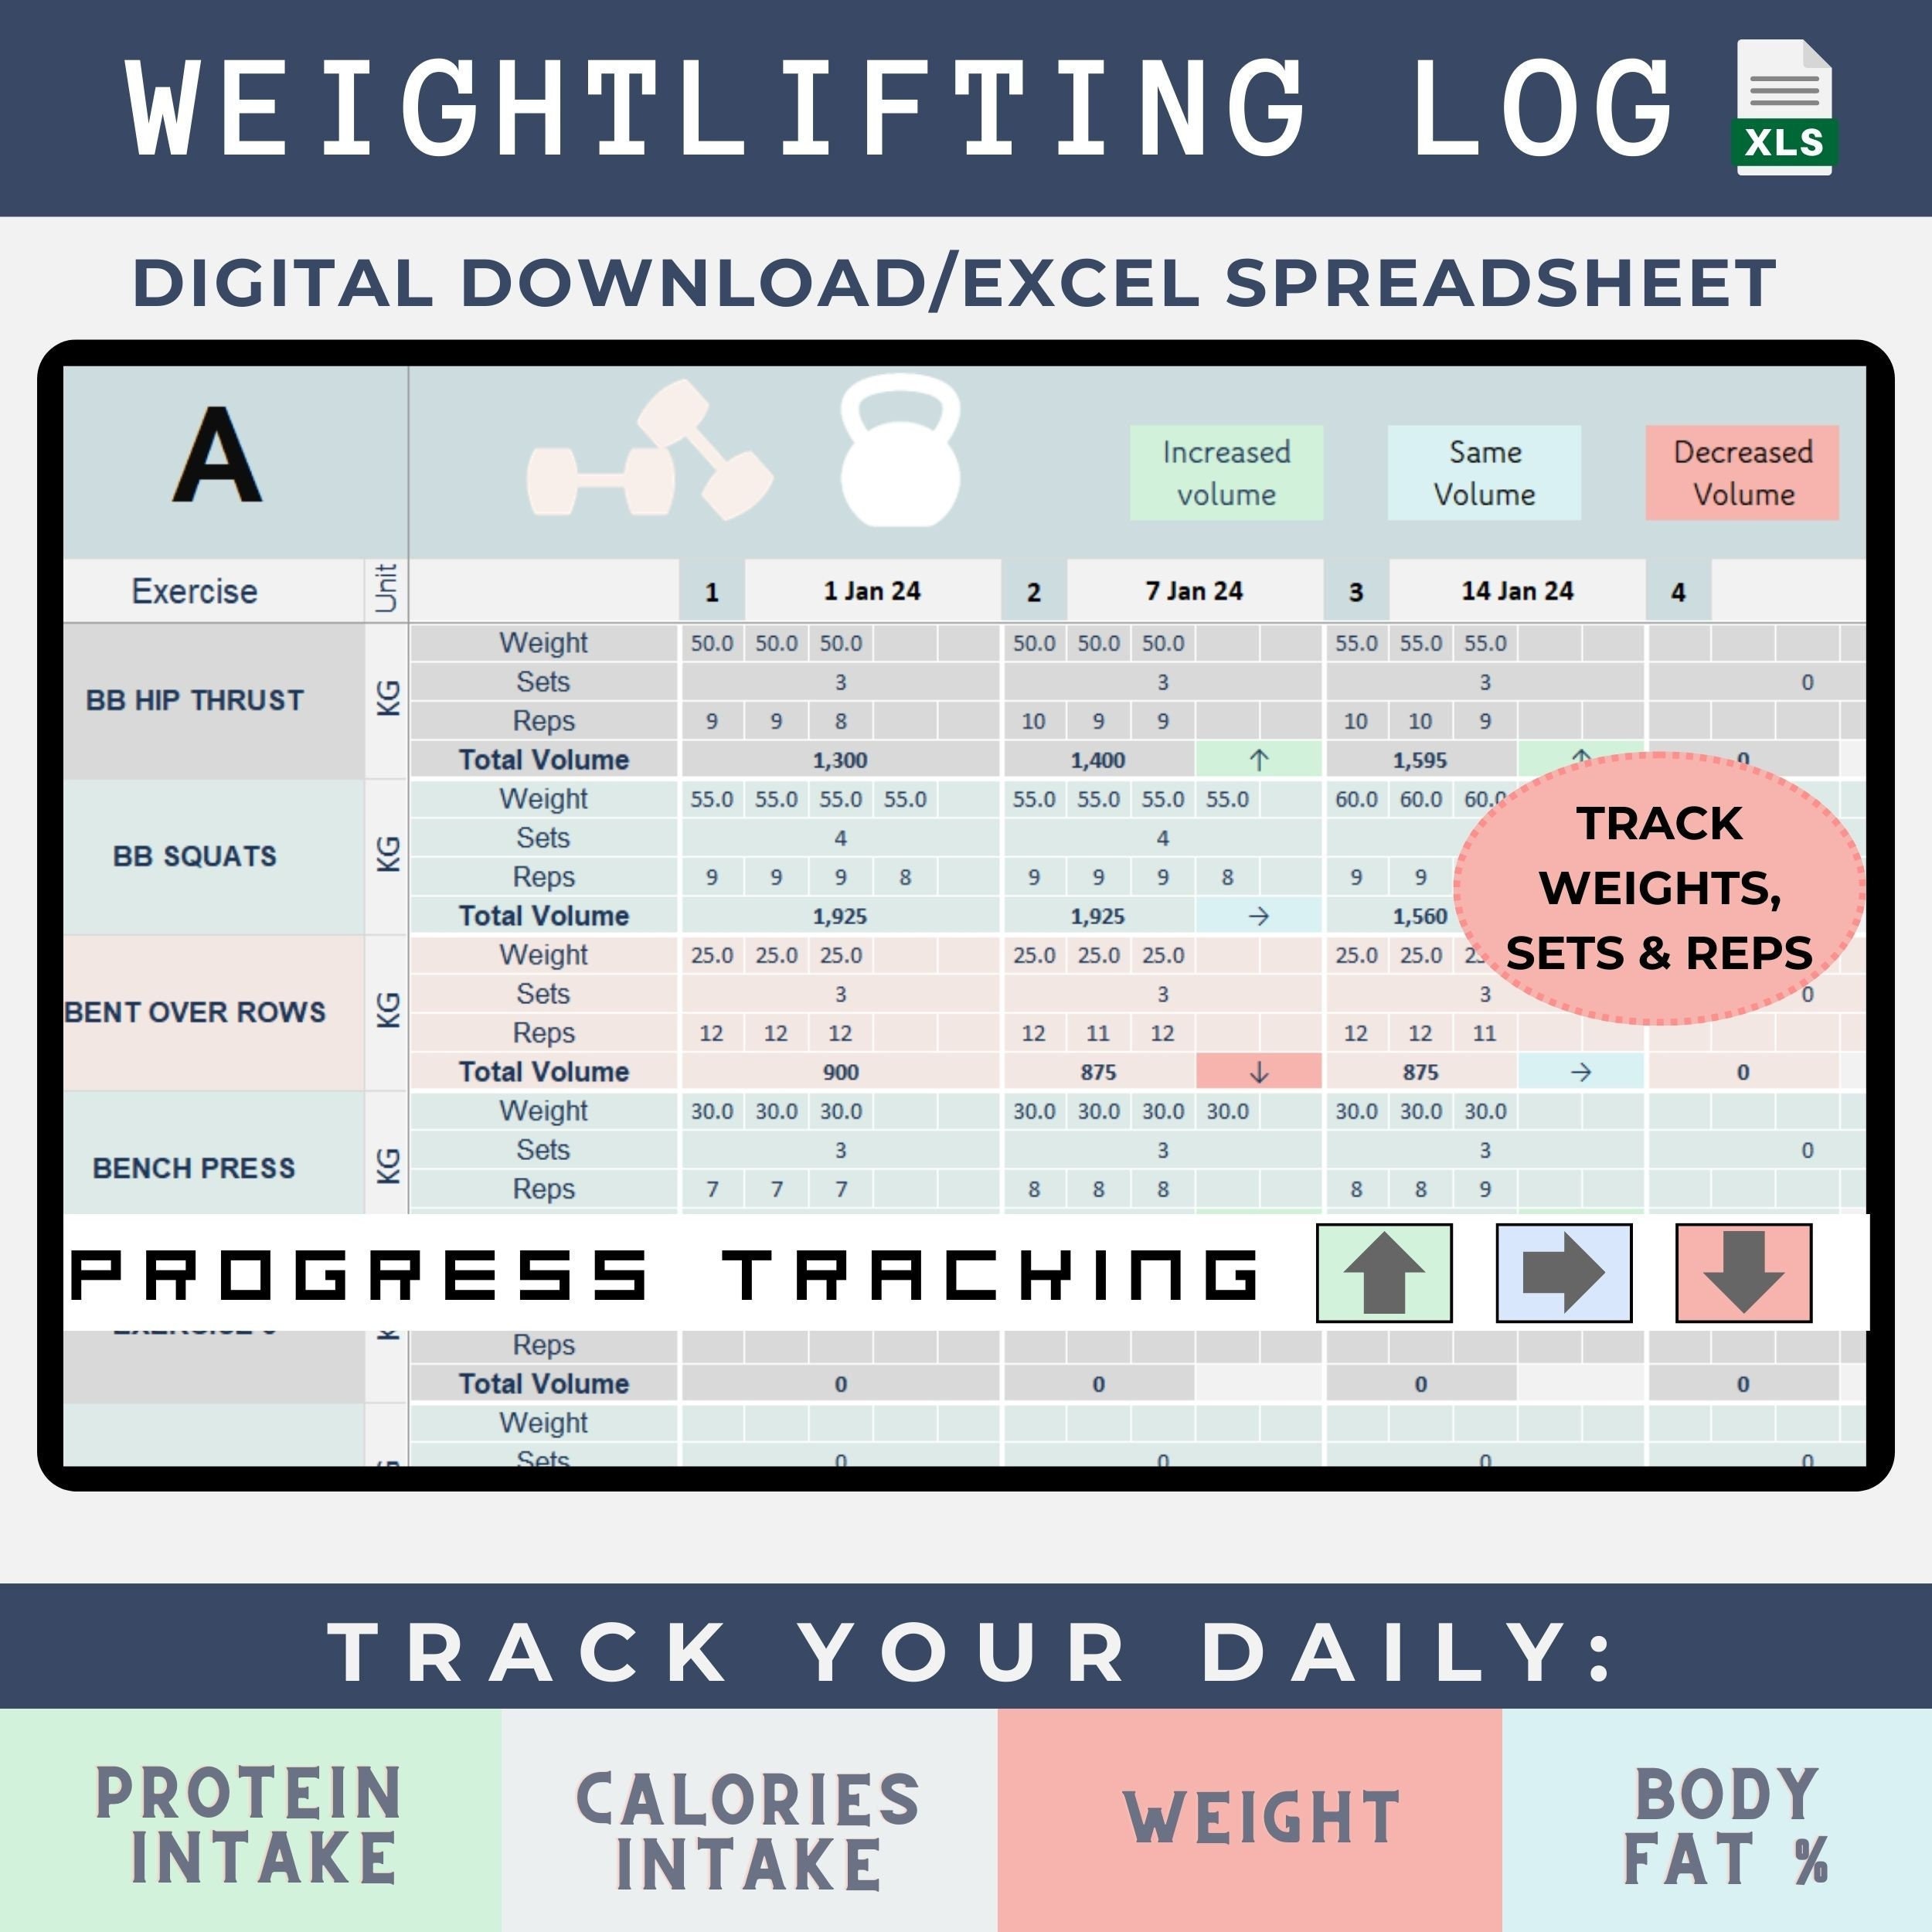
Sample Clean & Jerk Accessory Workout Program
| Muscle Group | Exercise | Sets | Reps | Rest (seconds) |
|---|---|---|---|---|
| Core | Plank | 3 | 30-60 second hold | 60 |
| Core | Hanging Leg Raises | 3 | 8-12 | 90 |
| Legs | Front Squats | 3 | 5-8 | 120 |
| Legs | Romanian Deadlifts | 3 | 8-10 | 90 |
| Upper Back | Pull-ups (or Lat Pulldowns) | 3 | As Many Reps as Possible (AMRAP) | 90 |
| Upper Back | Bent-Over Rows | 3 | 8-12 | 60 |
| Shoulders | Face Pulls | 3 | 15-20 | 60 |
| Full Body | Power Cleans (at 60-70% 1RM) | 3 | 3-5 | 120 |
Illustrative comparison based on the article research brief. Verify current pricing, limits, and product details in the official docs before relying on it.

No comments yet. Be the first to share your thoughts!